Magnetic Levitation
Levitation
- Introduction
- Why
- Other Maglev
- Hard Drive Maglev
- Schematic
- Parts List
- Buying Parts
- Woodworking
- Other's
- Photographs
- Infrared Emitter
- Photodetector
- Reference Det
- Difference Amp
- Feedback Loop
- Loop Equations
- Bode Plot
- Phase Lead
- Output Amp
- Coil Driver
- PWM
- Lifting Coil
- PSPICE
- Build Time
- PCB
- Power Supplies
- Setup
- Test Power
- Test IR Emitter
- Test Signal Det
- Test Ref Det
- Adjust Sensing Res
- Test Diff Amp
- Test Non-Invert Amp
- Test Coil Driver
- Test Lifting Coil
- Results
Testing the Lifting Coil
The lifting coil, umm, well, keeps the object aloft. To read about the lifting coil design and construction, go here.
Things To Check Before You Connect The Coil
Disconnect either wire to the coil, so you can take these measurements.
- Use your VOM or multimeter to check the resistance of the lifting coil. If it is very high (e.g. >20-kilohms) then you probably have an open connection or broken wire and it needs to be fixed or replaced. A resistance more than 100-ohm is probably too much to allow sufficient current to flow.
- A resistance in the range of 5 - 10 ohms driven with 1 - 2 amps has worked well in a few published designs.
- Does your coil have a solid ground connection? It carries a decent current (up to 1 amp) so you should have a heavier wire than most from the 2N3055 emitter all the way to the power supply ground connection. This ensures the extra current won't introduce noise into the sensitive electronics.
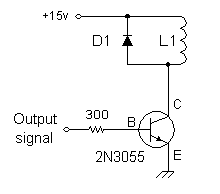
- Is your coil protection diode connected correctly? The diode is in parallel with the coil itself, and protects the electronics each time the output transistor turns off. It is screwed into a terminal strip, visible and labelled D1 in the figure. (See a close-up photo here. You need the diode because you wouldn't want the inductive kickback to blow up the output transistor or the op-amps.
- Did you file the bolt head smooth? The raised lettering may be causing an asymmetric field, which could lead to instability. Gotta be careful with filing though, you would hate to file off one of the windings!
- I had some trouble suspending long skinny things for more than a few minutes. I think the broad head of the bolt on the bottom of the electromagnet might work better in this regard if it were more pointy or a smaller diameter.
- Are you really sure you wired it correctly? Have a friend check all the wiring. In particular, make sure the capacitor in the phase lead network is hooked up right. It will be unstable if you didn't do it right.
Checking the Parts Alignment
- Is your lifting coil aligned in the box above the emitter/detector pair? You probably need to build the coil first and mount it in the box. Then make a horizontal line about 1/4-inch below the tip of the coil, and that will be the height of the emitters and the detector. Drill holes. Try shining a flashlight into one hole and see where it hits the other hole. That helps get them close to the right height. You will need some adjustability of the coil height; that's why the threaded bolt is the core of the coil. I threaded it into the top plank, but you could do something else, as long as it's adjustable. For example, you could use two nuts above/below the top plank to make adjustments. That would probably be easier than my method, because I can't turn mine very much before the coil's wires get rather tangled.
- Another word about alignment... Both the emitter and detector are wide-angle devices. They will emit and detect primarily across a 45-degree beam, but some light will go all the way out to 90-degrees from their axis. For the emitter you can shine almost any which way in there and it will work. However, a focusing bezel will improve the signal falling on the detectors.
- For the detector, you may need to pay a little attention to reducing the ambient light that gets in there. That's why you need a five-sided box (although a 6-sided box would work a lot better! ha). I pasted black paper on the side opposite the detectors.
Testing The Coil
 You
can test the output stage without any other electronics. Here's how.
- Can your coil lift things? Follow these steps to check out the lifting power of the final stage + coil alone.
- Disconnect the 300-ohm resistor from pin 6 of the non-inverting amplifier.
- Temporarily connect it to +15v.
- This will fully turn on the 2N3055 output transistor.
- The coil should firmly hold any iron objects that come close. It can probably hold up a big screwdriver or pair of pliers.
- If not, use your voltmeter to measure the voltage between the base and emitter of the 2N3055. If it is more than 1 volt, or less than 0.65 volts, then you have a problem that must be fixed.
- Does your coil overheat? Leave its power turned on this way, and check the coil temperature. See how quickly it gets warm, and use this information to know how long you can use the levitator before it needs to cool off.
- Return the 300-ohm resistor back to pin 6 of the non-inverting amplifier.
Your levitator should be working now! Try it out. Have fun!
| < Previous | Page 36 of 37 | Next > |
Last Update 2008-06-08
©1998-2024 Barry Hansen
©1998-2024 Barry Hansen