Barry's Coilguns
Mark 5
AFuriel's - How to Make a Arc Gap Switch
Arc Gap Switch's or commonly referred to as Spark Gap's. The gap between the contact's act as the switch. Once the voltage of the power source connected to the switch and device reaches the desired voltage to cause a arc between the the two contacts, the arc cause's the circuit to conduct closing the circuit untill the power source loose's enough voltage where the arc cannot sustain itself, collapsing.
Using a compressed chamber for the Arc Gap, increases the voltage breakdown. Where under normal air pressure a source of 1kv "1000 volt" may arc, the higher voltage breakdown due to increased pressure would cause the contacts to wistand arcing at a much higher voltage.
You may be wondering why would you want to use a higher voltage breakdown, think of the space between the contacts. If the arc gap where 1kv would have arced at normal atmospheric pressure, were to have the pressure increased sustaining the charging while holding back that higher voltage on the same seperated distance of the switch, and then as the voltage was at it's desired level you release the pressure not just causing the gap to arc. But allowing the arc to sustain itself for a longer time without collapsing with a lower resistence. In my experience I have found normal Arc Gap Switch's to be more then 40% less efficient then a solid state switched device such as a coilgun. While a normal Arc Gap Switch is nearly 50% as efficient as a solid state switched device, you can find much higher efficiencies using the pneumaticly controlled Arc Gap Switch due to the reason's I stated above. I have found Phneumaticly Arc Gap Switch's to be nearly 80% efficient as a Solid State Device such as a SCR.
The much higher efficiencies of a Phneumaticly Arc Gap Switch is why I advise you to use one over a normal Arc/Spark Gap.
Materials
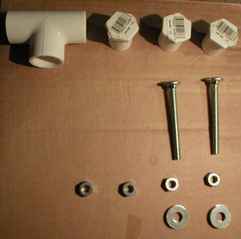
First the material's you will need, and tool's needed for assembly. I use PVC in my HV Arc Gap Switch's because PVC "Polyvinyl Chloride" is a excellent insulator, cheap, and it's easy to use.
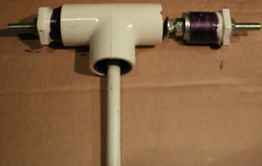
- "1" 1/2" PVC T Coupler
- "3" 1/2" PVC Male Endcaps "None-Threaded"
- "however many feet you want" 1/4" PVC Hosing
- "2" 1/4" Bolt's atleast 2 1/2" Long, "Larger the head's the better for less noise when discarging through the Arc Gap Switch due to larger surface area.
- "6" 1/4" Nut's
- "6" 1/2" Washer's
Tools

- Drill
- PVC Cleaner
- PVC Cement
- 1/4" Drill Bit & Threading Drill Bit
- Vise or Clamp/Wrench for holding PVC
Drill Holes
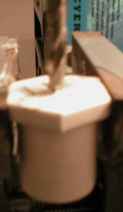
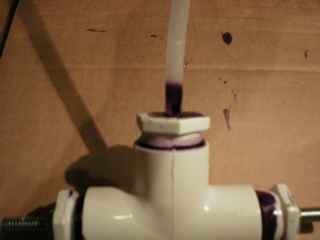
First step is to take your 3 Male PVC Endcap's, and your drill with the 1/4" drill bit inserted. And drill a center hole in each of the three endcap top's.
"Do not drill the third and final endcap nore thread the hole if you will not be making a pneumaticly controlled Arc Gap Switch."

Next remove the 1/4" drill bit from your drill and now insert the 1/4" Thread Drill Bit. Now thread each of the hole's you had just made on the top's of 2 of the endcap's.

With all the endcap's with a threaded hole on the top get your bolt's, washer's, and nut's for finishing the contact's.
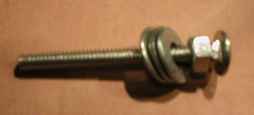
I use washer's for a air tight seal, if you will not be making a pneumaticly controlled Arc Gap Switch do not worry about washer's and making your arc chamber air tight.
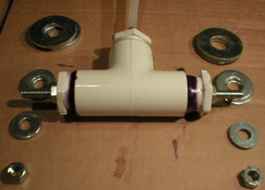
Assemble Bolts

Add a bolt first untill it is tightly against the head of the bolt, and 3 washers.
Screw the bolt with the bolt and 3 washer's into the endcap with the bolt's head facing out the end of the endcap.
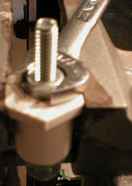
With the bolt threaded into the endcap screw on a second bolt onto the other end of the bolt on the endcap face side.
Place the partially finished contact into a vise or hold with a clamp wrench.
Tighten both bolt's on each side of the endcap.
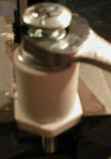
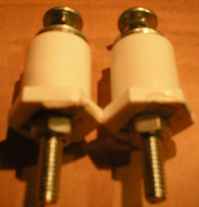
Duplicate a second contact from the following steps. Now you have 2 Finished contact endcaps.
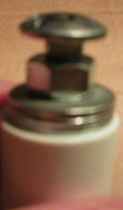
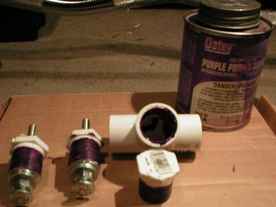
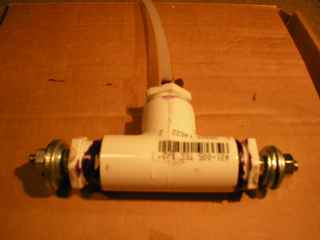
Assemble Pipe

Next take your end caps and T coupler, and place PVC Cleaner onto wherever the PVC will be joined, the outside's of the endcaps, and inside of the T coupler.
If you will not be making an air tight Pneumatic Arc Gap, you can skip this step.
Add PVC Cement to one of the finished contact endcap's, and insert it all the way into the T coupler untill you see it's in the very center of the coupler.

Next we are going to place a object the same diameter as the gap needed for the voltage you want to use in front of the first inserted contact bolt head.
Do not just go ahead and insert the second glued contact, the PVC Glue will bond the PVC together instantly so you will not have a chance to set the proper distance between the contacts.
Depending on what voltage your Arc Gap will be using, At normal pressure the voltage breaks down at 1mm per 1kv.
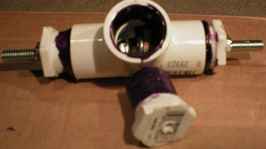
Insert the second contact endcap untill it is tightly against the object between the two contacts, remove the seperation object.
If you will not be making a air tight Pneumatic Arc Gap, you can skip the next 2 steps step.
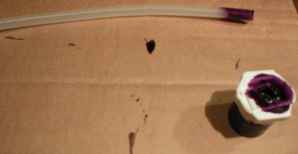
Insert PVC Hose
Next get your legnth of PVC 1/4 Hose, PVC Cleaner, and third endcap. Put cleaner on the end of the hose and into the top hole of the third endcap.
After the area where the cleaner was added is dry, place PVC glue onto the outside end of the PVC hose and insert it into the third endcap with half a inch coming out the inside of the endcap.
Let the glue dry and harden for 12 hrs, your Arc Gap Switch is almost finished.
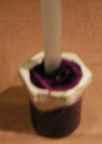
Connect Wires
With your Arc Gap now complete, if you have large wire's to connect your Arc Gap Switch to your device and capacitor/s use washer's on the cable connector's.
Screw on the last 2 nut's to each outside cable connector's, and you're done.
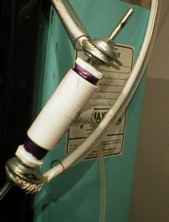
Here is one of my Pneumatic Arc Gap Switch's connected to a 15KJ Pulse Capacitor.
Final Notes
- Using Sch.40 PVC the pressure you use in the switch should not exceed 120psi.
- Atmospheric pressure on earth is about 12psi, where the pressure gauge on you compressor start's at 0.
- Roughly adding 12psi will yield twice the voltage breakdown as under normal pressure.
If you have a webpage of your own with a electrical project email me the URL, I'd love to see it.
| < Previous | Page 8 of 8 | Next > |
©1998-2026 Barry Hansen